Prerequisites:
Visual Studio Code: Ensure you have Visual Studio Code installed on your machine. You can download it from the official website:
https://code.visualstudio.com/download
Node.js: Ensure you have Node.js installed on your machine. You can download it from Node.js official website.
https://nodejs.org/en/download

- Download the latest version of installer for your respective operating system.
- Open the installer file and install Node.js on your machine
- After the installation is complete click on the finish button
To check if the node installation is completed:
- Open Command prompt in windows or terminal on Mac
- Type node –version to check if node is installed
- Type npm –version to check if node package manager is installed

Playwright project setup:
- Navigate to the root of the folder where you want to access or create your playwright project in
- Use the command npm init playwright@latest <your project name>

- Type y to proceed installing the package

- It will ask you for the programming language for you to start your scripts with, here we are going to select Typescript as it is the most recommended language to use with playwright.
- It’ll ask for the folder that you want to store your tests in. Select the default tests for now.
- Select false as we are not going to need GitHub workflow for the time being.

- Select true to install the browsers to run your scripts in.

Here you go, playwright has been successfully installed for your project.
Opening the project in VSCode:
- Open the project in VS Code by clicking on File -> Open folder and open the one that you have installed playwright in.

In a default Playwright project, the folder structure is typically simple and flexible, allowing you to organize your automation scripts, configuration files, and other resources according to your needs.
Let’s break down each component of this folder structure:
- package.json: This is the Node.js project configuration file. It lists project dependencies, scripts, and other metadata.
- package-lock.json: This file is automatically generated by Node.js to lock the versions of dependencies. It ensures consistency across different installations of your project.
- node_modules/: This directory contains the Node.js dependencies required for your project. It’s created when you run npm install. It will contain @playwright/test for now as we’ve implemented playwright in this project.
- playwright.config.ts: This file defines project-specific configuration options for Playwright. For example, you can specify browser settings, device emulation, and more in this file.
- tests/: The “tests” folder (tests/) is dedicated to storing your Playwright test scripts. These scripts are typically written in TypeScript and use testing frameworks like Jest, Mocha, or Jasmine to structure and manage your tests. Each test script file in the “tests” directory (e.g., test1.spec.ts, test2.spec.ts) corresponds to a specific test case or test scenario that you want to automate with Playwright. These scripts can include test assertions, setup, and teardown logic.
It will contain an example.spec.ts file to refer to how a test file normally looks like
Run the example test file:
- To check if you’re able to run the tests in the project, follow the steps:
- Click on Terminal -> New Terminal (Click on the three dots if the terminal section is not visible)

- After the command is visible, enter the command npx playwright test example.spec.ts (example.spec.ts as we are now running the example ts file by playwright to check the run)

- You will get the message of running the tests with number of workers. Playwright provides a feature called “workers” to parallelize the execution of tests across multiple browser contexts. This can significantly improve the efficiency and speed of running your end-to-end tests.
- To generate the html report run the following command as also shown in the terminal:
npx playwright show-report
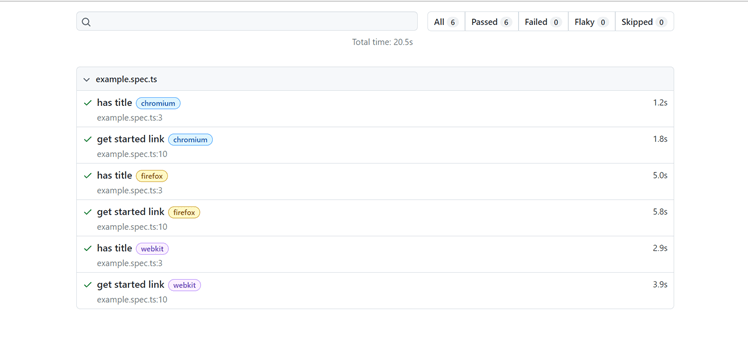
Your report will be generated and will open automatically in a browser and will something like shown in the above image.

You can expand each of the tests and view the execution in detail.
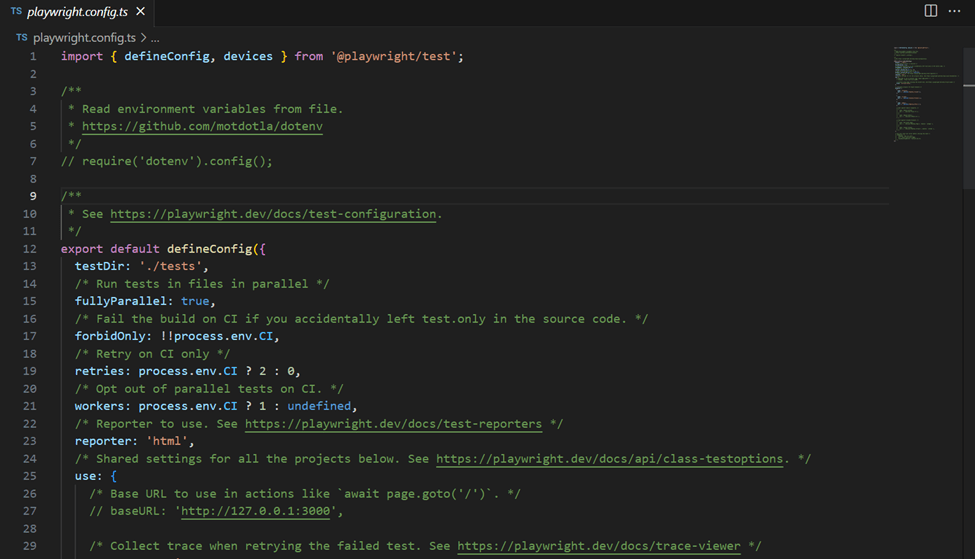
Config file walkthrough:
This playwright.config.ts file is a central place to specify test-related settings, such as test directories, test reporters, test execution modes, and more.
We’ll have a look at it in detail:
Imports:
The configuration file imports necessary modules from Playwright Test to define the configuration.
Environment Variables (Optional):
It includes the option to read environment variables from a file (using dotenv) if you need to set environment-specific configuration.
Configuration Object:
defineConfig() is used to define the Playwright Test configuration object.
testDir:
Specifies the directory where your test files are located. In this example, it’s set to ‘./tests’.
Parallel Execution:
fullyParallel allows running tests in parallel for improved performance.
CI-Specific Configuration:
forbidOnly and retries are configured based on whether the tests are running on a Continuous Integration (CI) environment. It forbids the use of ‘test.only’ and retries failed tests on CI.
Number of Workers:
The workers setting defines the number of workers for parallel execution, using one worker locally and potentially more on CI.
Test Reporter:
Specifies the test reporter format, in this case, ‘html’.
Shared Settings:
The use object contains shared settings for all test projects. For example, you can set a base URL for your tests.
Test Projects:
The projects array defines different test projects for different browsers (Chromium, Firefox, WebKit, etc.). Each project can have its specific configuration, such as browser settings.
Local Development Server (Optional):
The webServer section allows you to run a local development server before starting tests. This is useful for testing against a locally hosted web application.
Feel free to customize and adapt this configuration file to your specific testing needs. You can uncomment and modify sections as necessary, depending on your project’s requirements and testing environment.
You can start using Playwright with Typescript in this manner. I hope this makes it easier for you to set up and begin using Playwright without any worries.
Thank you, Aditya for your valuable inputs for the blog.
